Portfolio Work
Here you can find the work and completed projects I have produced from my semester in Interactive Multimedia.

Mood Board
This first project I created is a mood board. It is a visual representation of ideas and themes I have thought of for creative projects. Mood boards can help keep professional designers on track and inspired.
My board features four Earth tone colors with four similarly themed pictures. The quote from John Mure sums up the theme of nature and adventure.
Personal Logo
Using Adobe Illustrator, I was able to create these designs. These designs are hand drawn with varying effects. There are four variants for each of the three designs. The top most are the full color and full size. Below that are the scaled down color options. Further down still, are the full sized black & white variants. At the very bottom are black & white in smaller scale.
I chose to create three unique designs because of the various possibilities and situations that they could be used in. It is for the same reasons that there are black & white and scale variants. The logo needs to have the capability to change based on appropriate context and still look clear and sharp.

How to Use the Spot Healing Brush Tool in Adobe Photoshop
This tutorial is a demonstration of how to use the Adobe Photoshop tool: Spot Healing Brush. The tool is used to retouch images by removing small objects and blemishes. to follow along, the tutorial will begin once you have Photoshop open with the image or project you want to be working on.
Step 1
First, we want to zoom in slightly on the area we will be working on by selecting the zoom tool on the left-hand side of the screen and clicking on the desired area. You can use the hand tool (located directly above the zoom tool) to center or move your image by clicking and dragging.

Step 2
Once the work area is in view, go back over to the tool banner on the left, and select the spot healing brush tool. Make sure to not confuse it with the healing brush tool located directly underneath it. You should be using the Spot Healing Brush tool.
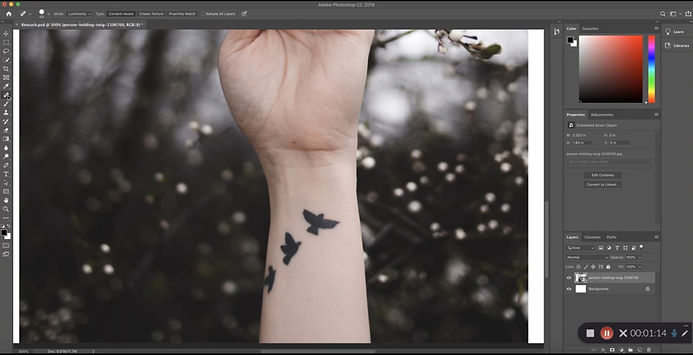
If you get this pop-up when you click on your image with the spot healing brush tool, it simply means that you have to rasterize the image before the tool will work. Clicking "OK" on the pop-up will automatically do this for you. Then the tool will work as normal.

Step 3
Next, find the spot that you would like to remove. The brush should be just slightly bigger than the spot you are removing. You can adjust the brush size larger by using the shortcut: (Shift + ]), or smaller: (Shift + [). You can also adjust the brush size by clicking on the brush picker in the options bar in the top left and sliding the bar like so. Once adjusted accordingly, simply click to see the spot disappear.

Step 4
To use the spot healing brush tool to remove irregular and longer shapes, simply hover over the area and adjust the brush size accordingly the same way as mentioned before, and then click and drag the brush over the affected area.

Step 5
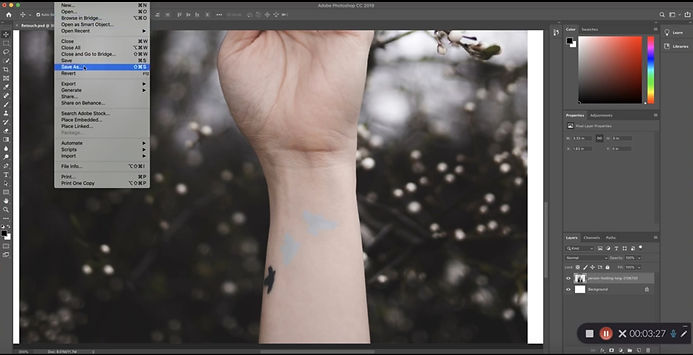
Once all areas are retouched to your liking, select "File", and "Save As..." to save your work. Make sure to select Photoshop (.psd) in the drop-down menu where it says "Format". Once you click "Save", you have successfully saved and finished this tutorial.